
Image Pixel Converter
The Image Pixel Converter changes a photo's size three ways: by pixels, to a file size in KB, or to a print size in centimeters or inches. It runs in your browser, so your photo stays on your device and is never uploaded. Choose a photo above to start; the guide below explains each option.
What is the Image Pixel Converter?
It's a resizer built around the size you were asked for. Each tab handles one kind of size:
- Pixels: a width and height, a percentage, or a shape such as 1:1, 4:5 or 16:9.
- File size: a limit in KB, for upload forms that refuse bigger files.
- Print size: centimeters or inches at a DPI, saved in the file so it prints at that size.
You see the result in the image area while you adjust it, then select Convert and download the new file.
One photo, three kinds of size
An upload form says "maximum 100 KB". A passport photo has to be 3.5 x 4.5 cm. A profile picture should be square. Each asks for a different kind of size, and they're easy to mix up.
Pixels decide how much detail an image holds and how big it shows on a screen. The file size in KB decides whether a form accepts it. The print size depends on the pixels and the DPI together: 413 x 531 pixels at 300 DPI print at 3.5 x 4.5 cm. The converter has a tab for each, so you can go straight to the size you were asked for.
Every change is drawn from your original photo, never from an earlier result, so you can try sizes freely and nothing builds up. Because the work happens in your browser, ID photos and private pictures never leave your device. The trade-off: very large photos depend on your device's memory, so an older phone may struggle where a computer won't.
How to use the converter
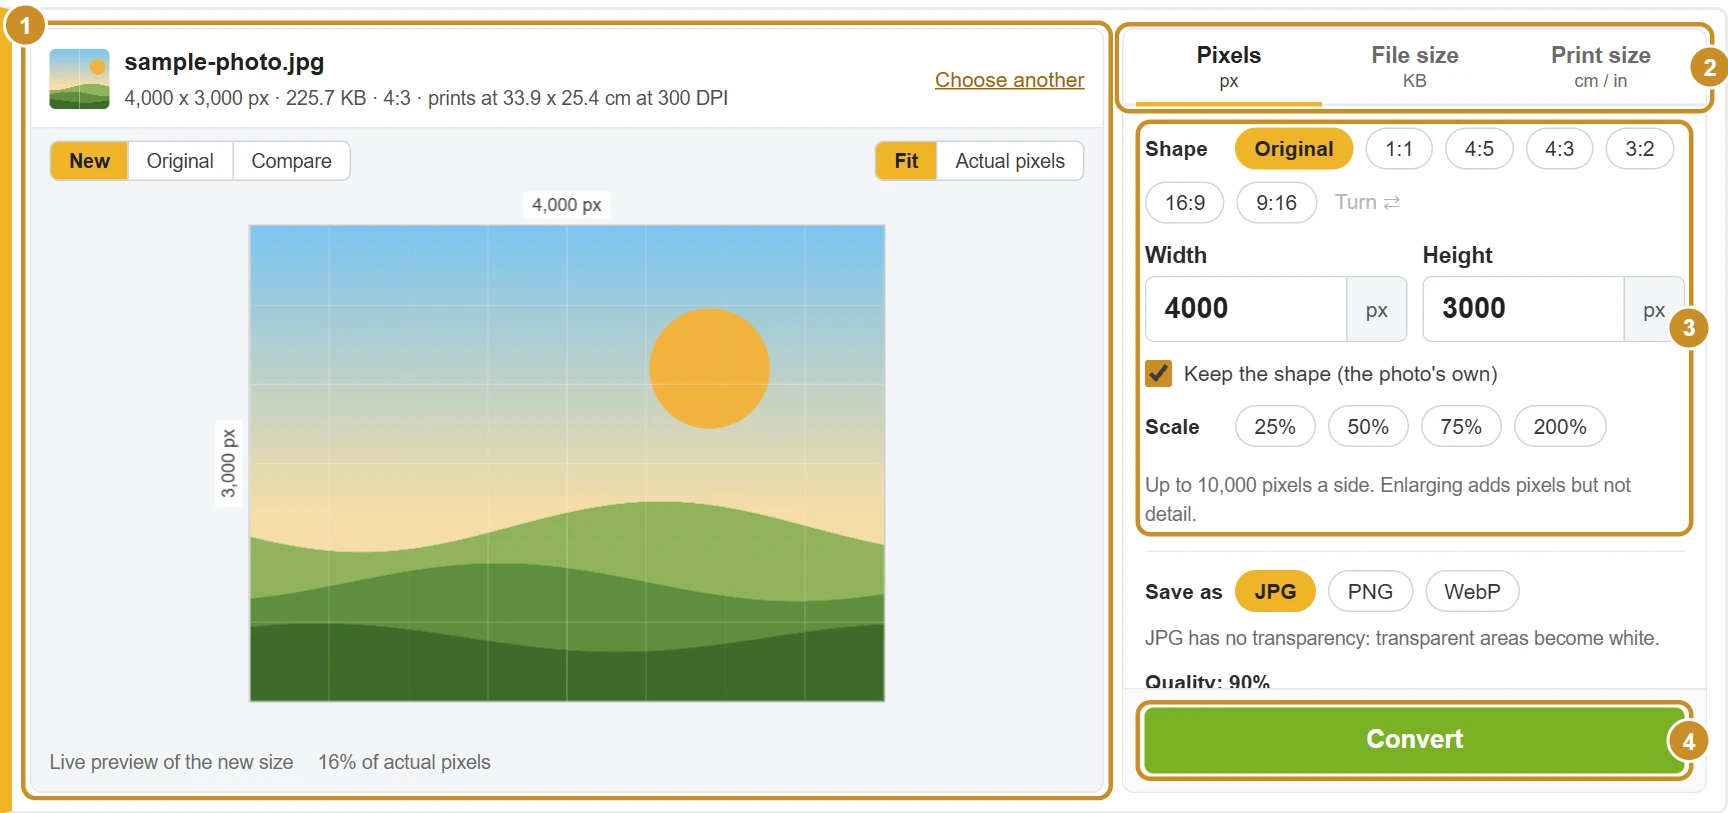
- Step 1: Select Choose a photo in the image area, or drop a photo on it. It appears right away, with its pixels, file size, shape and print size at 300 DPI.
- Step 2: Pick a tab on the right: Pixels, File size (KB) or Print size (cm or inches).
- Step 3: Set the size and watch the image change as you go. If the new shape differs from your photo's, choose Crop, Fit or Stretch.
- Step 4: Choose the format under Save as, then select Convert. Check the result in the image area (try Actual pixels) and select Download.
Your results, explained
The image shows the sample photo (4000 x 3000 pixels) converted at 50% on the Pixels tab, with Compare on.
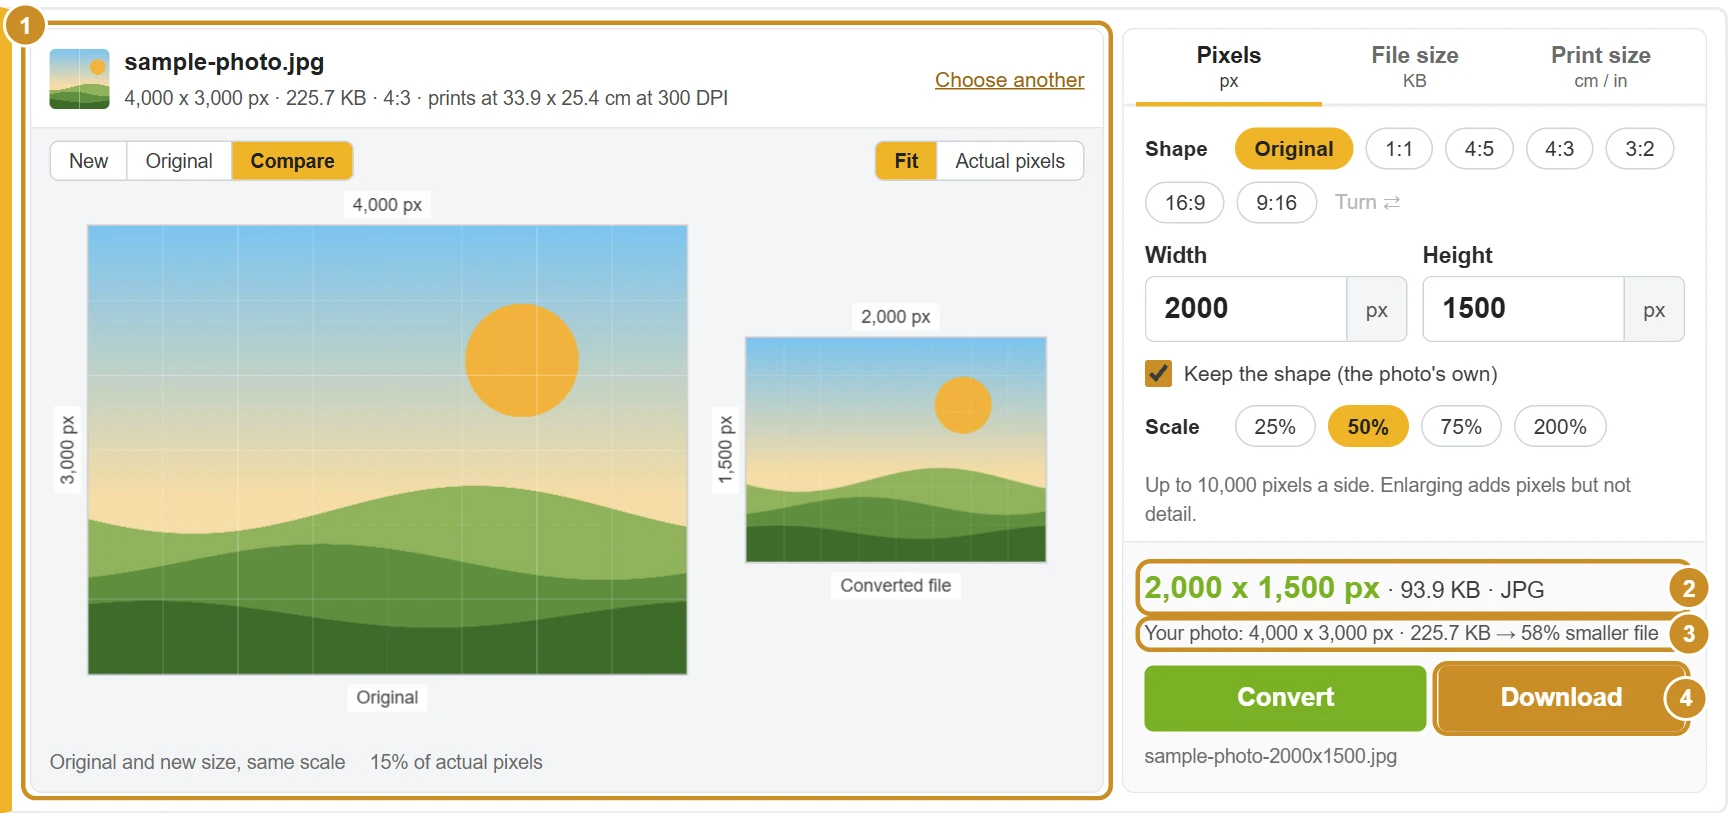
1. Image area
A live preview of the new size while you change the settings, then the converted file itself after Convert. Here it's in Compare view: the original and the new size side by side, at the same scale.
2. New size: 2000 x 1500 px
The new pixel size, file size and format. On the Print size tab this line also shows the print size and the DPI saved in the file.
3. Change from your photo
How the new file compares with the one you chose: its pixel size and how much smaller or larger the file is.
4. Download
Saves the new file to your device, named after your photo and its new size (shown under the button). Your original isn't changed.
See the new size before you save
The image area shows your photo as soon as you choose it and redraws it every time you change a setting, always from your original. The buttons above it choose what you see.
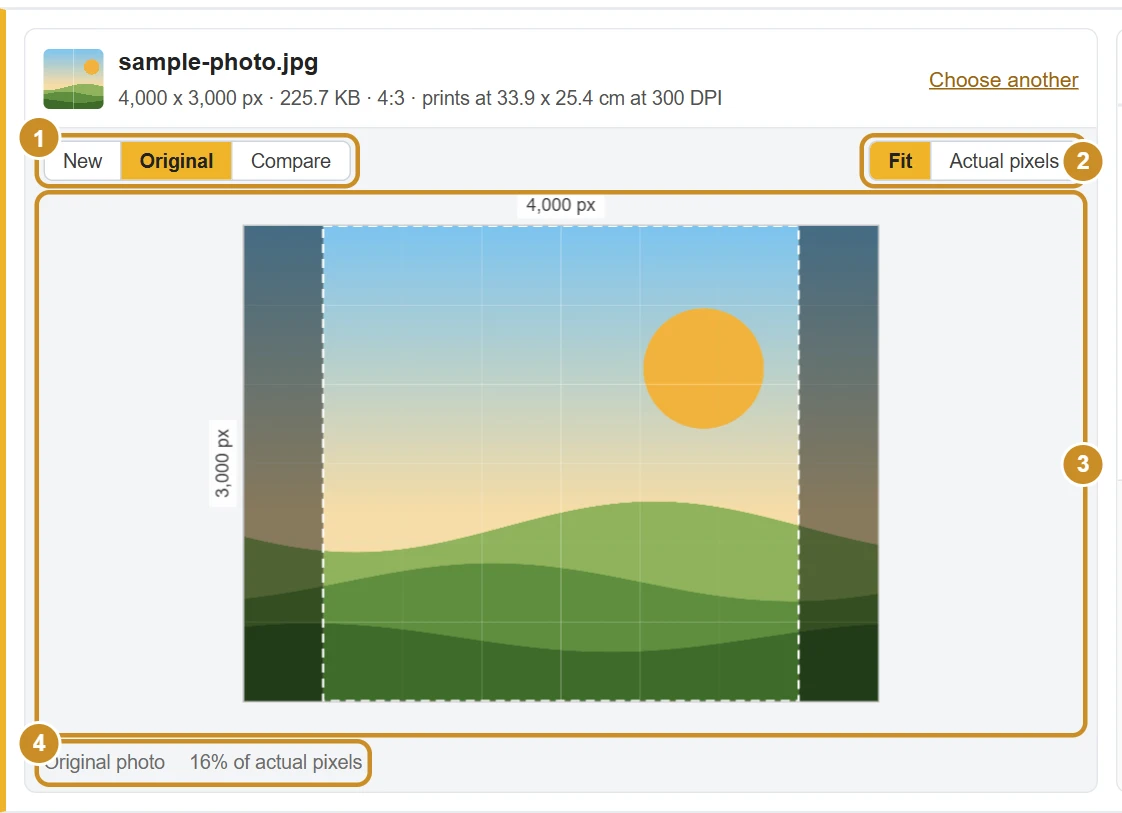
1. New, Original, Compare
New shows the new size with the crop, fit or stretch applied, and after Convert the converted file itself, so you can check JPG or WebP quality. Original shows your photo with the part a crop will trim dimmed. Compare puts both side by side at the same scale.
2. Fit or Actual pixels
Fit fits the image in the area. Actual pixels shows one image pixel per screen pixel, adjusted for high-density screens, so you see how big the new size really is. Double-click the image to switch between them.
3. The image
Its size in pixels is labelled along the top and left edges. When it's bigger than the area, drag it (or use the arrow keys) to move around.
4. What you're seeing
Which view is on (live preview, original or converted file) and the zoom, for example "25% of actual pixels".
How each tab works: inputs and results
The converter has three tabs, chosen on the right of the tool. Pick one below to see exactly what it needs and what it shows. Every tab starts from your original photo, and you can switch between them at any time.
Answers: How do I make my photo an exact width and height in pixels, or a set shape such as a square?
Inputs
| Input | What to enter |
|---|---|
| Shape | Original keeps the photo's own shape. 1:1, 4:5, 4:3, 3:2, 16:9 and 9:16 set a new one, and Turn swaps it between landscape and portrait. Example: Original |
| Width and Height | The new size in whole pixels, up to 10,000 a side. 1,080 and 1080 px both work. Example: 2000 x 1500 |
| Keep the shape | Ticked, the height follows the width (and the other way round). Untick it to type any width and height. Example: Ticked |
| Scale | 25%, 50%, 75% or 200% of the photo's own size. Example: 50% |
| Crop, Fit or Stretch | Shown only when the new shape differs from the photo's. Keep (or Place) chooses which part shows, and Fit adds a Background color. Example: Crop, Center |
| Save as, Quality and Keep under (optional) | JPG, PNG or WebP; the quality for JPG and WebP; and an optional limit in KB that lowers the quality without changing the pixels. Example: JPG, 90%, blank |
Results
| Result | What it tells you |
|---|---|
| Image area | A live preview of the new size while you change settings, then the converted file itself after Convert. Original, Compare and Actual pixels show it in other ways. |
| New size line | The saved file's pixel size, file size and format, for example 2,000 x 1,500 px · JPG. |
| Your photo → smaller or larger file | How the new file compares with the one you chose. |
| Download | Saves the file, named after your photo and its new size. |
The maths
Keep the shape: height = width ÷ (shape width ÷ shape height), rounded to whole pixels
Scale: width = photo width × percent ÷ 100, and the height follows the shape
Crop keeps the largest part of the photo with the new shape; Fit scales the whole photo to fit inside and fills the rest with the background color
Example
A 4000 x 3000 pixel photo at 50% becomes 2000 x 1500. As a square (1:1) it can be 3000 x 3000 at most, and Crop trims 25% of the photo.
Answers: How do I get a photo under a size in KB for an upload form?
Inputs
| Input | What to enter |
|---|---|
| Maximum file size | The limit in KB, typed or chosen with the 20, 50, 100, 200 or 500 KB buttons. Decimals are allowed. Example: 100 |
| Save as | JPG or WebP. PNG isn't offered because it has no quality setting to lower. Example: JPG |
Results
| Result | What it tells you |
|---|---|
| New size line | The new file's pixel size, file size and format, with the quality that was used. |
| Under 100 KB | Confirms the file is under your limit, and says so if the pixels had to be made smaller to fit. |
| Couldn't get under … | Shown instead when even the smallest version is too big. Try a larger limit. |
| Image area | Shows the converted file, so you can check the quality at Actual pixels before you download it. |
The maths
Target = KB × 1,000 bytes, so 100 KB means at most 100,000 bytes
The highest JPG or WebP quality from 92% down to 40% that fits, found by halving the range
If even 40% is too big, both sides shrink by about √(target ÷ file size) and the search runs again
Example
With a 100 KB limit the file must be 100,000 bytes or less, which passes forms that count 1 KB as 1,000 or 1,024 bytes. The pixels stay the same unless quality alone can't get there.
Answers: How many pixels does a print size need, and how do I save a photo at that size in cm or inches?
Inputs
| Input | What to enter |
|---|---|
| Sizes | Common photo sizes: 3.5 x 4.5 cm, 2 x 2 in, 4 x 6 in and 10 x 15 cm. Check your passport or ID rules for the exact size. Example: 3.5 x 4.5 cm |
| Width, Height and Unit | The print size in cm or in. Decimals are allowed; changing the unit converts the values. Example: 3.5 x 4.5 cm |
| Keep the photo's shape | Ticked, the height follows the width using your photo's shape. Unticked, any size, and the photo is cropped or fitted to it. Example: Unticked |
| DPI | Pixels per inch of print: 150, 300 or 600, or your own from 10 to 1,200. Example: 300 |
| Save as | JPG or PNG; both store the DPI. WebP isn't offered because it doesn't. Example: JPG |
Results
| Result | What it tells you |
|---|---|
| = 413 x 531 px at 300 DPI | The pixels for that print size, shown as you type, before you convert. |
| Prints at … (saved in the file) | After Convert: the print size and the DPI written into the JPG or PNG, so printing software uses that size. |
| New size line and Download | As on the Pixels tab: the saved file's size and format, and the button to save it. |
The maths
Pixels = cm ÷ 2.54 × DPI, or inches × DPI, rounded to whole pixels
Width: 3.5 ÷ 2.54 × 300 = 413.386 → 413 px
Height: 4.5 ÷ 2.54 × 300 = 531.496 → 531 px
Example
A 3.5 x 4.5 cm photo at 300 DPI is 413 x 531 pixels, and at 600 DPI 827 x 1063. A 2 x 2 inch photo at 300 DPI is 600 x 600.
Resize an image in pixels
On the Pixels tab, type the new width and the height follows, keeping the photo's shape. The Scale buttons do the same by percent: a 4000 x 3000 photo at 50% becomes 2000 x 1500 pixels.
For a different shape, pick one under Shape. A square (1:1) from the same photo is 3000 x 3000 pixels at most, and Crop trims 25% of the photo: the left and right edges, or the part you choose under Keep. For a 4:5 post 1080 pixels wide, choose 4:5 and type 1080: the height becomes 1350. Turn swaps a shape between landscape and portrait, for example 3:2 and 2:3.
Untick Keep the shape to type any width and height; then choose how the photo fills the new shape. Fit shows the whole photo with bands of a background color, and Stretch squeezes it, which distorts faces and circles.
Reduce an image to a size in KB
On the File size tab, type the limit (or tap 20, 50, 100, 200 or 500 KB) and select Convert. The converter keeps your photo's pixels and tries lower JPG or WebP quality settings until the file fits, using the highest quality that does. If even 40% quality is too big, it makes the pixels smaller in steps until the file fits, and the result tells you it did.
"Under 100 KB" here means under 100,000 bytes. Some forms count 1 KB as 1,000 bytes and some as 1,024, so a file under 100,000 bytes passes either way.
How small a photo gets depends on what's in it: fine detail such as leaves, gravel or text needs more KB than smooth sky or walls at the same pixel size. PNG can't be squeezed this way because it keeps every pixel exactly, so this tab saves JPG or WebP.
Change image size in cm or inches
A size in centimeters or inches needs a DPI (dots per inch) to become pixels. On the Print size tab you type the size and the DPI, and the converter works out the pixels. For a 3.5 x 4.5 cm photo at 300 DPI:
Width: 3.5 cm ÷ 2.54 × 300 = 413.386 → 413 px
Height: 4.5 cm ÷ 2.54 × 300 = 531.496 → 531 px
413 x 531 pixels, saved with 300 DPI
For inches, skip the ÷ 2.54: a 2 x 2 inch photo at 300 DPI is 600 x 600 pixels, and a 4 x 6 inch print is 1200 x 1800. At 600 DPI the 3.5 x 4.5 cm photo would be 827 x 1063 pixels: same paper size, more detail.
The DPI is written into the saved JPG or PNG, so printing and layout software places it at the size you set instead of guessing. If your photo's shape differs from the size (a 4000 x 3000 photo is wider than 3.5 x 4.5 cm), choose Crop and the part to keep. For passport, visa or ID photos, the size is only one rule: check the head size, background and other requirements for your country.
Before you save
These catch most resizing surprises:
Enlarging a small photo
A bigger pixel size doesn't add detail; the photo just gets softer. Start from the largest version you have.
Starting from a copy that's already small
Photos sent through messaging apps or saved from social media are often reduced. Choose the original file when you can.
Stretching instead of cropping
Stretch changes the shape of everything in the photo. Use Crop to keep people and objects looking right.
Losing transparency in a JPG
JPG can't be see-through, so a logo with a transparent background gets a solid one. Save as PNG or WebP to keep it.
Quick checklist
- Note the size you were asked for: pixels, KB, or cm / inches.
- Choose the original photo, not a smaller copy.
- Check the crop in the image area (Original view shows what's trimmed) before downloading.
- Keep your original; the converter saves a new file.
Frequently asked questions
How do I change the size of an image in pixels?
Choose the photo, stay on the Pixels tab and type the new width; the height follows to keep the shape. Pick a shape such as 1:1 or 16:9 if you need one, then select Convert and Download.
How many pixels is 3.5 x 4.5 cm?
413 x 531 pixels at 300 DPI, or 827 x 1063 pixels at 600 DPI. Pixels = centimeters ÷ 2.54 × DPI, rounded to whole pixels. The Print size tab works this out and saves the DPI in the file.
How do I reduce a photo to 100 KB?
Use the File size (KB) tab: type 100 or tap the 100 KB button, then Convert. The tool lowers the JPG or WebP quality step by step until the file fits, and makes the pixels smaller only if quality alone isn't enough.
Why can't I save a PNG at a set size in KB?
Because PNG keeps every pixel exactly, so it has no quality setting to lower. To reach a size in KB, the tool saves a JPG or WebP instead. Transparent areas become white in a JPG.
What does the DPI on the Print size tab do?
It decides how many pixels go into each inch of the print, and it's saved in the file so printing software uses the right size. A 2 x 2 inch photo at 300 DPI is 600 x 600 pixels; a 4 x 6 inch print is 1200 x 1800.
Is my photo uploaded?
No. The photo is opened and converted by your browser on your device. Nothing is uploaded, saved or sent to our server, and the new file goes straight from your browser to your downloads.
How can I see an image at its actual size?
Use Actual pixels above the image: it shows one image pixel per screen pixel, adjusted for high-density screens, so a 1080 pixel wide image takes the width it really has on screen. Drag to move around a large image, or double-click it to switch between Fit and Actual pixels.
Does making an image bigger improve its quality?
No. Enlarging adds pixels but not detail, so the image gets bigger without getting sharper. For the best result, start from the largest version of the photo you have.
Does the new file keep the photo's details, like location?
No. The converted file doesn't include the original's hidden details, such as the camera model, date or GPS location. Only the picture is saved, plus the DPI on the Print size tab.